M-208 console monitor PCB assembly

Laszlo

Well-Known Member
Joined
Jan 16, 2019
Messages
82
Karma
17
From
Near Budapest, Hungary
Gear owned
Tascam Ampex Mechlabor
Hi Guys,
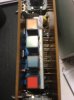
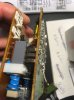
can anyone advice how the two (twin) monitor boards are attached to each other? (ps see the pics attached) I can see pins coming out from the switches of PCB A and soldered into PCB B, but just dont know if they are detachable (from the switches) or I need to solder each pins out of the PCB.
Have a nice day,
Laszlo
 

Attachments

  • IMG_0165.JPG
    IMG_0165.JPG
    42 KB · Views: 17
  • IMG_0166(1).JPG
    IMG_0166(1).JPG
    49 KB · Views: 14
Did you ever figure this out? I'm a little confused by this as well.
 
Yes, you desolder the long pins one by one, and then you can separate the two modules, without any problem.
Also, once you are repairing that module, since the headphone pot tends to develop contact issues, so this is a good opportunity to desolder the pot, dissassemble it, and tighten the commutators of the sliding contacts, also you can deoxit and relube it.
 
I did in all of the summing stages, and in one channel board, but I could not make a real test, because I sold it recently. The replacement amps were 5532 for the generic, and LM 4562 for the input stage. Those who are using her now, have not complained so far :)
 
Hi guys, re the monitor level pot, I had trouble with mine on the M-208 I bought recently. The monitor pot was scratchy and often broke contact and I had disassembled the pot and adjusted the contacts, then reassembled. I was surprised to get the same problem again after a short time. Pressing the knob downwards restored the sound momentarily. While re-capping the power supply during the last day, I also looked at the monitor board again.
I found that the small tangs that are supposed to locate in holes in the front panel were not, so were not allowing the board to sit evenly against the front panel. Also, since the pot nuts help to hold the board(s) in place, tightening them was pulling the end of the pot away from the main body of the pot, because the PCBs were contacting the front panel before the pot did.
I nipped off the tangs and used a thin washer as a spacer between pots and front panel. I also used some vinyl under the "Bracket, bottom cover" which serves to hold the PCBs in place. Now I have perfect headphone sound. I thought I would have to try fitting a non-standard pot, but thankfully have avoided that scenario!
 

New threads

Members online

No members online now.