Guide to Installing FW1884 in Windows 10 and Cubase 9.5

Jed Dexter

New Member
Joined
Aug 7, 2018
Messages
8
Karma
1
From
United Kingdom
Gear owned
FW1884
Hi, I've recently been reinstalling my PC system and given the amount of threads on getting the FW884 to work I thought I would keep notes on how I reinstall on Cubase 9.5 and Windows 10 to share on here.

For info, since the 1.80 Tascam Driver for Windows 7 I have haven't had many issues really with the FW1884. Occasionally the firewire light might not come on at bootup but that's about it. Unplugging and switching back on soon resolves.

My steps are a combination of ones I have collected on here over the years so apologies for any duplication. At least if I forget myself I will have a thread to refer back to!
So I will split this into Stages, to make it easier to digest:
 
STAGE 1:

Download 1394 OHCI Legacy Driver.msi file

Available at:
https://support.microsoft.com/en-gb/kb/2970191
"FireWire port-based device does not work correctly in Windows 8.1 or Windows 8"

Link to driver (x64)
https://www.microsoft.com/en-us/download/details.aspx?id=44219

Once downloaded double click on installer.

When you do this it will appear like nothing has happened, but it has created a folder with the legacy drivers in your Program Files:
C:\Program Files (x86)\1394 OHCI Compliant Host Controller (Legacy)\x64_driver
C:\Program Files (x86)\1394 OHCI Compliant Host Controller (Legacy)\x86_driver

STAGE 2:

Install "1394 OHCI Compliant Host Controller (Legacy)"

After you install the 1394 OHCI Legacy Driver.msi file, follow these steps:

1.Right-click the Legacy1394.inf file (Setup Information) under one of the following paths based on the computer's architecture:
•C:\Program Files\1394 OHCI Compliant Host Controller (Legacy)\x86_driver
•C:\Program Files\1394 OHCI Compliant Host Controller (Legacy)\x64_driver
2.Click Install.
3.Open Device Manager in Control Panel.
4.Expand IEEE 1394 Bus host controllers, and then locate the host controller.
5.Right-click the host controller, and then click Update Driver Software.
6.Click Browse my computer for driver software.
7.Click Let me pick from a list of device drivers on my computer.
8.Click Generic1394 OHCI compliant host controller (Legacy), and then click the Next button.
(mine is listed as "1394 OHCI Compliant Host Controller (Legacy)")
9. Message should be displayed: Windows has successfully updated your drivers.
10. Click the Close button.

The MS article then says this is required:

Restart requirement:
You have to restart the computer after you apply this update.

This isn't prompted for, but it won't harm to perform a restart.
 
STAGE 3

Install FW1884 Software

1. Download FW1884_Win_1.80 and ensure FW1884 is NOT connected to the computer.

http://tascam.com/product/fw-1884/downloads/
(v1.80 is the final version written for Windows 7)

2. Right click the installer and select 'Properties'
3. Click on the Compatability tab.
4. Under 'Compatability mode' tick the box for 'Run this program in compatability mode for:
5. Once ticked the greyed out dropdown menu will be visible to select earlier Windows version.
6. Select Windows 7.
7. Next under 'Settings' tick the box for 'Run this program as an administrator'.
8. Click Apply, then OK.
9. Now run the Installer. If in doubt, right-click and select Run as Administrator.
10. Double click to run the software.
11. Select language and location to install (default is: C:\Program Files\FW1884)
12. Windows Security may then bring up a box: "Would you like to install this device software?"
13. Ensure the box is ticked for 'Always trust software from "Frontier Design Group, LLC"'
14. Click Install.
15. Setup Wizard confirmation box will appear stating setup has finished installing FW1884 on your computer.
16. Click Finish to exit Setup.
17. SoftLCD shortcut should now appear on your Desktop.
18. Now connect the FW-1884 to the computer and turn it on.
19. Plug and Play may run if it detects the FW-1884 and starts the Add New Hardware wizard.
(mine didn't, so this could depend on Windows version)

STAGE 4

Configure Windows Default Audio Device and FW-1884 Control Panel

The next part is setting the FW-1884 as the default audio device (if you have multiple):

1. Open Control Panel.
2. Select Sounds then Manage Audio Devices.
3. On the Playback tab select FW1884 Analog 1:2, and select Set Default.
nb. Since moving to Windows 10 I've found the Default format has been setting to 48kHz. I use 44.1 kHz.
4. Therefore to check or change this, right-click FW1884 Analog 1:2 and select Properties.
5. On the Advanced you will see the Default Format. Change this to what you use in your DAW e.g. "2 channel, 16 bit, 44100 Hz (CD Quality)"
nb. I use 24 bit in my DAW, but noticed playback issues with Media Player and You Tube etc. It seems to like defaulting to 24 bit, 48 kHz best. but this could depend on your system.
6. Repeat the same step on the Recording tab.
7. Click Apply, then OK.

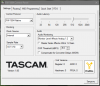
Finally set FW-1884 Control Panel Settings.

8. Click on the FW-1884 Control Panel.

(this didn't work straight away for me, so I had to do a reboot. However I attempted this install a couple of times to remember the steps so may have messed it up slightly).

9. Select your Control Protocol e.g. I use Cubase Pro 9.5 so I select 'Cubase SX / Nuendo'.
10. Set Audio Latency. Default appears to be 256. If in doubt select 512.
11. Select Clock Source (e.g. Internal) and Sample Rate (e.g. 44.1 kHz).
12. Below Sample Rate it should say "In Sync".
Every time you change one of these settings it will temporarily disappear whilst it refreshes.

Some of these settings are available on the unit (hold down "Clock" button).

Confirm FW-1884 is working

13. The quickest way to do this is to play some music from Media Player, or open up You Tube.
If this works you are all set!
 
STAGE 5

Configure DAW (Cubase 9.5)

Much of this should be covered by your DAW manual and in the Tascam Driver Release Notes, but there are couple of things to set for full functionality.

1. In Cubase -> Device Setup -> VST Audio System, set ASIO Driver to 'ASIO FW-1884'.
2. Click the + symbol and then select 'Mackie Control'.
3. For MIDI Input and MIDI Output select 'FW1884 Control'.
4. Next select the User Commands as you like to map them, or leave as default.
(if you're interested in some mappings I like to set see Stage 7 below)

STAGE 6

Enable EQ Encoders

For some reason from Cubase 8.5 onwards to get the EQ encoders working the following needs to be applied:

1. Click on Devices menu, then 'Mackie Control'.*

*nb in Cubase 9.5 click on Studio -> More Options -> Mackie Control.
2. A small window with a dropdown will appear and this will be default to 'Cubase'.
3. Click on the drop-down and select 'Compatibility'.
4. EQ encoders should now work!
 
Last edited:
STAGE 7

Example Button Mappings (Cubase)

OK I have to got to this stage and realised the steps I've recorded for Cubase relate to v8.5, as I am setting up both v8.5 and v9.5. The main difference is the menus 'Devices' and 'Device Setup' are called 'Studio' and 'Studio Setup' in v9.5. But the rest is the same.

Here are some example mappings I use - just including them in case you haven't configured these before.
The FW-1884-Cubase supporting guide does
advise to map some of these.

1. Go to Studio menu and select Studio Setup.
2. Under 'Remote Devices' select 'Mackie Control', which you will have created at Stage 5 above.
3. In User Commands you will need to first select the Category and then Command for each Button.

e.g. Button = User B
on the FW-1884 this is the SHTL button next to the jog wheel. It's not really doing anything so I set as the metronome.

4. Click on the Category field and select 'Transport'.
5. Click on the Command field and select 'Activate Metronome'.
6. Repeat these steps for each mapping you want to set.
7. Then click Apply, then Done.

The main thing here is to understand how Cubase refers to F2, but on the FW1884 this is labelled as F7 (ie. same button as the clock source INT button).

OK, pasting a table in here isn't straightforward so here is an image of my typical mappings.

FW1884 Cubase User Mappings.png
 
  • Like
Reactions: Buck
Excellent, you're a lifesaver! Got my fw-1884 working with these instructions! If only I could still get rid of the intermittent audio performance dropouts..
 
Very helpful, Jed. Thanks!
 
I'm getting a blue screen when I choose the legacy driver so you know how to force the installation? Please help
 
What if i dont have "in Sync"
 

Attachments

  • 2023-12-09_21-26-20.png
    2023-12-09_21-26-20.png
    78.7 KB · Views: 7
No,it's ok.Can it be because of my firewire type?I have 4p-6p,i heard that it's better to use 6p-6p.
(sorry for rus inscriptions)2023-12-10_11-42-16.png
 

New threads

Members online