One of the things I enjoy is seeing other studios. I generally get ideas from those photos of enhancements or better ways of doing something of which I've not thought about before. So, here's a pic of mine in the hopes that it offers some ideas and can help others.
You are using an out of date browser. It may not display this or other websites correctly.
You should upgrade or use an alternative browser.
You should upgrade or use an alternative browser.
Sharing Studio Ideas
- Thread starter skier
- Start date
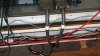
In an attempt to keep the wiring neater without the cost of purchasing actual wiretrays, I made some using PVC drain pipe. I thought about commercial wiretrays, but the fact that they're metallic and may augment unwanted EMR coupling and the high cost had me looking for alternative solutions. I cut the PVC pipe lengthwise on my tablesaw and used sheetrock screws to mount them. The upper tray carries shielded audio cables at line and mic levels. The lower tray carries the electric "noise emitters", such as power, speaker level signals, USB, Firewire, Wordclock, MIDI, etc. Cables can cross at 90 degrees with minimal coupling. This approach has worked quite well and I have had no problems with induced noise or power harmonics.
Attachments
Last edited:
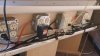
For controlling power, I use a 1U rack-mounted power strip that has 8 switched receptacles. I plug mounted duplex or quad receptacles boxes into the control unit. The boxes allow me to control multiple devices with one switch. I've placed them in logical groups that I want to turn on and off together. For example, the computer and related equipment are on the same circuit (computer, 2 monitors, etc.) The mixer circuit includes the DM4800, monitor crossover, mic preamps, headphone amp, etc. The monitor circuit includes the main monitors, subwoofer, the auxiliary monitor amp, etc. Other circuits include ambient lighting, synthesizers, and more, but you get the ideas.
The receptacle boxes are numbered with the circuit number. I remember what switch controls which circuit (e.g. number 1 is the mixer circuit), but there are several receptacle boxes on the same circuit and having them numbered lets me know that every receptacle box numbered 1 will go on/off with circuit switch 1. There may be a better method, but this has worked well thus far, though I'm always open to better ideas.
The receptacle boxes are numbered with the circuit number. I remember what switch controls which circuit (e.g. number 1 is the mixer circuit), but there are several receptacle boxes on the same circuit and having them numbered lets me know that every receptacle box numbered 1 will go on/off with circuit switch 1. There may be a better method, but this has worked well thus far, though I'm always open to better ideas.
Attachments
Last edited:
- Joined
- Feb 16, 2016
- Messages
- 1,027
- Karma
- 1,099
- From
- West Wales, UK
- Website
- www.philizound.co.uk
- Gear owned
- dp-32sd
Nice neat layout skier - puts mine to shame, although I am stuck in older technology ") Here's my 2-cents...
Here's my 2-cents...
Cable runs
A similar idea for supporting cables with hardware-store hooks spaced every 40cms or so.

Not as neat as yours as the wires are exposed - they also need holding in place with tie wraps to stop them drooping and also when the studio grew and the hooks started overflowing. The room has a 15cm skirting board so can get two parallel runs using the small hooks one above the other to keep audio & non-audio cables apart. The larger L-shaped hooks are for the massive (& heavy!) cable runs from the mixer & recorder to the patch panels.
Cable clamps
These are custom-made slabs of steel bolted to the QwikLok racks to clamp up to 10 x 6mm audio cables per side.


They also work for mains cables, midi cables etc. There's an article and more pics here: http://www.philizound.co.uk/freebies/audio-wiring/audio-wiring.html
Re-usable tie-wraps are also very useful.

They have a ratchet mechanism so can be released, although this is a bit tricky when you're on the floor reaching round the back of a rack and can only use one hand... but it can be done!
Main cables
4-way sockets tie-wrapped to vertical struts on each rack, leaving the horizontal struts free for audio clamps. One is the 'master' (ideally with individual on/off switches) so only one mains wire enters each rack. Extra 4/6-way sockets fan out from this to power the gear within the rack. The switches allow sections to be isolated for maintenance. More photos in the 'audio wiring' article.
Patch Bays
Labelling was always an issue, especially when things need changing - the layout has gone through several incarnations due to moving house or rooms, and of course buying new gear") Final solution was to use a word processor and print an A4 sheet for several panels, with colour coding as reqd, then laminate the whole sheet and slice it up into strips. Stick the strips on with very small blobs of blue-tack. I tried self-adhesive labels but these make a real mess when things need changing. Small alterations can be marked up with the permanent marker pen, then when too many things have changed, I just edit, reprint & laminate a fresh sheet.
Final solution was to use a word processor and print an A4 sheet for several panels, with colour coding as reqd, then laminate the whole sheet and slice it up into strips. Stick the strips on with very small blobs of blue-tack. I tried self-adhesive labels but these make a real mess when things need changing. Small alterations can be marked up with the permanent marker pen, then when too many things have changed, I just edit, reprint & laminate a fresh sheet.

Balanced/Unbalanced
The first layouts used unbalanced cable - managed to acquire lots of RG58 cable from my old place of work as every time they re-wired an office, all the old ethernet cabling was ripped out and scrapped. As long as everything was earthed, I managed to eliminate all hum from almost all the gear even though some of the wires were 10m long. The only issues were certain bits of gear which refused to play ball no matter how short the cables. DI boxes would have solved that, but the other 'niggle' was the mix of signal levels (+4dBu vs -10dBV) and balanced vs unbalanced gear, so eventually I bit the bullet for the next incarnation and changed everything to balanced.
MIDI
Standard balanced patchbays and patch cables are also used for MIDI routing.

The bottom two patch panels in the photo are an example. There's an article here: http://www.philizound.co.uk/freebies/midi-wiring/midi-patch-panels.html
Digital routing
I only use a computer for front-end editing and back-end CD burning or MP3 conversions. Everything else is done with a stand-alone hard-disc recorder and analogue mixer and outboard gear, so an old Fostex DP-8 links these digitally with fibre-optic cable and/or coax.
Cable labelling
Some self-adhesive labels can end up being a gooey mess after a few months/years when the glue breaks down (can recommend 'sticky stuff remover' - it does exactly what it says!). Tried an expensive dymo labelling system once - looked really promising with nice neat thermal-printed lettering, but after a couple of years the glue was fine... but all the lettering had faded, doh! Best solution for me was to use light-coloured cables such as white or yellow, and hand-write on the cable using a permanent marker pen. Not as neat as printing, and the ink gradually defuses into the plastic and becomes slightly blurred over time... but they're still perfectly readable after many years - and no glue in sight.
Patch cables
These hangers are really useful - a bit pricey but they'll last forever.

The ones shown here have 10 slots and each slot holds 6 audio cables with 1/4" jacks. The mono patch cables on the right are for the modular synth.
Here's my 2-cents...Cable runs
A similar idea for supporting cables with hardware-store hooks spaced every 40cms or so.
Not as neat as yours as the wires are exposed - they also need holding in place with tie wraps to stop them drooping and also when the studio grew and the hooks started overflowing. The room has a 15cm skirting board so can get two parallel runs using the small hooks one above the other to keep audio & non-audio cables apart. The larger L-shaped hooks are for the massive (& heavy!) cable runs from the mixer & recorder to the patch panels.
Cable clamps
These are custom-made slabs of steel bolted to the QwikLok racks to clamp up to 10 x 6mm audio cables per side.
They also work for mains cables, midi cables etc. There's an article and more pics here: http://www.philizound.co.uk/freebies/audio-wiring/audio-wiring.html
Re-usable tie-wraps are also very useful.
They have a ratchet mechanism so can be released, although this is a bit tricky when you're on the floor reaching round the back of a rack and can only use one hand... but it can be done!
Main cables
4-way sockets tie-wrapped to vertical struts on each rack, leaving the horizontal struts free for audio clamps. One is the 'master' (ideally with individual on/off switches) so only one mains wire enters each rack. Extra 4/6-way sockets fan out from this to power the gear within the rack. The switches allow sections to be isolated for maintenance. More photos in the 'audio wiring' article.
Patch Bays
Labelling was always an issue, especially when things need changing - the layout has gone through several incarnations due to moving house or rooms, and of course buying new gear
Final solution was to use a word processor and print an A4 sheet for several panels, with colour coding as reqd, then laminate the whole sheet and slice it up into strips. Stick the strips on with very small blobs of blue-tack. I tried self-adhesive labels but these make a real mess when things need changing. Small alterations can be marked up with the permanent marker pen, then when too many things have changed, I just edit, reprint & laminate a fresh sheet. Balanced/Unbalanced
The first layouts used unbalanced cable - managed to acquire lots of RG58 cable from my old place of work as every time they re-wired an office, all the old ethernet cabling was ripped out and scrapped. As long as everything was earthed, I managed to eliminate all hum from almost all the gear even though some of the wires were 10m long. The only issues were certain bits of gear which refused to play ball no matter how short the cables. DI boxes would have solved that, but the other 'niggle' was the mix of signal levels (+4dBu vs -10dBV) and balanced vs unbalanced gear, so eventually I bit the bullet for the next incarnation and changed everything to balanced.
MIDI
Standard balanced patchbays and patch cables are also used for MIDI routing.
The bottom two patch panels in the photo are an example. There's an article here: http://www.philizound.co.uk/freebies/midi-wiring/midi-patch-panels.html
Digital routing
I only use a computer for front-end editing and back-end CD burning or MP3 conversions. Everything else is done with a stand-alone hard-disc recorder and analogue mixer and outboard gear, so an old Fostex DP-8 links these digitally with fibre-optic cable and/or coax.
Cable labelling
Some self-adhesive labels can end up being a gooey mess after a few months/years when the glue breaks down (can recommend 'sticky stuff remover' - it does exactly what it says!). Tried an expensive dymo labelling system once - looked really promising with nice neat thermal-printed lettering, but after a couple of years the glue was fine... but all the lettering had faded, doh! Best solution for me was to use light-coloured cables such as white or yellow, and hand-write on the cable using a permanent marker pen. Not as neat as printing, and the ink gradually defuses into the plastic and becomes slightly blurred over time... but they're still perfectly readable after many years - and no glue in sight.
Patch cables
These hangers are really useful - a bit pricey but they'll last forever.
The ones shown here have 10 slots and each slot holds 6 audio cables with 1/4" jacks. The mono patch cables on the right are for the modular synth.

Hey Phil,
Thanks for sharing your ideas and the kind words! But I think you're being too hard on yourself regarding your own studio and how you've used hooks and wraps. Truth be told, cabling maintenance is not easy, and it's a pain to make changes later. And I'm impressed with how you've solved many of your problems and how neat they look to me.
Cable Runs
What I really needed was a convenient way to keep low-level signal cables that will subsequently get lots of amplification (mic & line cables) away from all those aforementioned noise generator cables (power, USB, MIDI, etc.) With tie wraps, I was forever cutting and re-tying whenever I made changes. When I designed this studio, I knew I needed something better.
In the electric utility business in which I consult, we use commercial wireways. When you're running phone, Ethernet, or other low-level cables parallel to 3 phases of 35kVolt cables each carrying several hundred amps, you can imagine the flux density and size of such magnetic fields. So, low-level cables need to be spaced apart, shielded, or both, and you need a neat, safe way to do that, including the ability to re-enter those wireways (after powering down, of course). The studio has a similar situation, albeit at much lower levels. The cut drain pipes meet that need inexpensively and conveniently. They still don't look as neat as an enclosed wireway, but they work well, cabling changes are easy, and they cost much less.
The cables running to the back of your patch panels look neater than mine ever did. The DM mixer made my patch panels go away. I still have a couple that I use for bringing the XLR channel connectors to the front of the equipment rack, but my routing is now done in the mixer. I still need to make my cables from the panels look more like yours.
Cable clamps
Your custom clamps look great! I've used re-usable tie wraps and agree that they're better than permanent wraps. The problem I've had with them is the one you describe, trying to release one behind or under something that you have to do by feel can be a real pain.
Cable Labeling
Yes, this is always an issue. I've done as you said, printing adhesive label sheets using a word processor, which is a pain because it requires you to know and enter all your label text BEFORE you print the sheet. These days, I use an actual cable labeler. I need it for my consulting anyway, so I get the benefit of having it for my studio. That said, it still has limitations because it uses adhesive labels. Changing out equipment means that the label needs to be changed when you use that same cable for other equipment/application. The glue on these labels is a little cleaner than that on the adhesive sheets, but it does still leave a residue and I find myself using Naptha to clean the cables before re-use.
I could also buy cable sleeves that don't stick to the cables —the technicians will often do that on individual conductors. However, those conductors don't have connectors on them — cables do, so that wouldn't work well for our needs. Therefore, it's still a crapshoot — a neater crapshoot, but a crapshoot nevertheless.
Balanced/Unbalanced
I agree: balanced and +4dBu levels wherever possible. I don't have much gear at -10dBV, but all interconnections with guitars, basses, and their amps is unbalanced as well as the DI boxes. Either way, we're forced to deal with these situations.
Digital routing
I only have a small amount of digital cabling, some S/PDIF and Toslink from the mixer to a Focusrite interface. I route the S/PDIF in the power tray with no problems. The fiber can be run in either. Occasionally, someone comes over with a piece of equipment needing an AES/EBU connection and we just run that on the floor — he takes the equipment away when he leaves.
Patch cable storage
Mine is a mess. I have a storage room next door to my studio and I've hung all my patch cables via nails in the beams. It's ok, but I need to get hangers like you have.
All in all, you've got a much bigger challenge than I. You have a commercial studio with much larger demands for patching and cabling than I do for a personal project studio. Even when I record a friend's band, my needs are far more modest than yours. I think you've done a great job based on your descriptions and the photos you included.
I must admit, I really like this sharing of ideas. I've garnered some from you and I hope that some of mine will help you and others. I'll post some more, and hopefully, so will other members.
Thanks much!
Last edited:
Another thing I've found that has made my studio racks less cluttered is to use short IEC C-13 cables. Most gear with removable C-13 cables come with 4 to 8 foot cables — that's much too long for rack-mounted equipment. It forces us to coil, tie-wrap, or otherwise deal with excess cable length. Using short cables really makes hookup easier and far neater. 
Here's an example:
https://www.amazon.com/CablesOnline-Short-3-Conductor-Power-PC-111-5/dp/B00N05P3ZE/ref=sr_1_fkmr2_1?s=industrial&ie=UTF8&qid=1494873288&sr=1-1-fkmr2&keywords=iec c-13 power cords 1 foot "5-pack"
I just bought a 5 or 10 bag of 18", 24" and 36" cables. The cords are re-usable as gear gets swapped out and replaced, so you don't have to keep buying cables. It's no different than our caches of cables, such as TS, TRS, XLR, MIDI, etc.
Last edited:
- Joined
- Oct 2, 2012
- Messages
- 1,824
- Karma
- 417
- From
- Queens, New York
- Website
- cmaffia.wix.com
- Gear owned
- 2 x DM3200, DA-3000

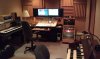
Whoa! Cool looking pic of the decks and control center! I don't recognize the display on the bottom center monitor - what does it tell you?
- Joined
- Oct 2, 2012
- Messages
- 1,824
- Karma
- 417
- From
- Queens, New York
- Website
- cmaffia.wix.com
- Gear owned
- 2 x DM3200, DA-3000
The top monitor shares both 2SeeMy display for both consoles using an A/B switch. The other three monitors are Cubase. Left is project screen, middle is Cubase mixer (inputs only) and EQ and right is the project mixconsole.
Thanks for explaining! I use one monitor for the PT Mixer and one for the Editor. I've thought of adding one more monitor, but don't currently have the shelf space. It appears that you're using something like an articulated arm for your 2SeeMe monitor or some monitor mounting frame of sorts. Am I correct or is it something else? I ask because I'm looking for a way to add that 3rd monitor.
Finally, when in control rooms with 2 or 3 rows of monitors for the consulting I do, we've found that the upper monitors often cause neck fatigue and have experienced it myself. As a result, I've tried to keep my studio monitors as low as possible. Have you had any such problems using the upper monitor?
Finally, when in control rooms with 2 or 3 rows of monitors for the consulting I do, we've found that the upper monitors often cause neck fatigue and have experienced it myself. As a result, I've tried to keep my studio monitors as low as possible. Have you had any such problems using the upper monitor?
- Joined
- Oct 2, 2012
- Messages
- 1,824
- Karma
- 417
- From
- Queens, New York
- Website
- cmaffia.wix.com
- Gear owned
- 2 x DM3200, DA-3000
I ditched the shelf that came with my desk. First off it didn't give enough clearance for the MU-1000 so I had to modify it and used it that way for a short while. Once I went past 3 monitors I realized I needed another solution. For the monitors I am using the following items in combination:
http://www.ebay.com/itm/360762117158?_trksid=p2055119.m1438.l2649&ssPageName=STRK:MEBIDX:IT
http://www.ebay.com/itm/381206239370?_trksid=p2055119.m1438.l2649&ssPageName=STRK:MEBIDX:IT
What's nice is between the design and the black acoustical foam on the wall, the monitors always look like they are floating. It's a cool effect.
I recently added the back-lit Nuendo/Cubase keyboard which looks cool as well. It also acts as a USB hub with two ports located on the front left and front right.
I am not experiencing neck fatigue with the 2SeeMy monitor. Its not as high as it looks when sitting and its angled down. It is less of an annoyance than than always having to stand up and readjust the LCD brightness to read it because if always drifts from the optimal setting.
@cmaffia — Thanks for the info on the monitor mounts! Yes, it does look as if the upper, center monitor is quite high, and also that the monitors are all floating (pretty cool!) I've thought of ditching the shelf, but it gives me a place on which to mount the under-shelf lighting that lights the DM, so I've kept it for now. The slant of the DM surface plus the meter bridge require the shelf to be higher than I'd like, which raises the monitors. I've looked at solutions that recess the mixing desk (e.g. the Argosy studio consoles) hoping to get the DM a little lower, but am not completely happy with them either. I'm still noodling out the available options and my specific "wants", not the least of which the consoles are each designed for a specific desk and the DM's life appears especially limited now that it's discontinued as we've previously discussed.
The solutions you've discovered and created yourself are helpful for many of us — please keep sharing, as will I, and thanks much!
The solutions you've discovered and created yourself are helpful for many of us — please keep sharing, as will I, and thanks much!
- Joined
- Oct 2, 2012
- Messages
- 1,824
- Karma
- 417
- From
- Queens, New York
- Website
- cmaffia.wix.com
- Gear owned
- 2 x DM3200, DA-3000
If you have the 2SeeMy card and aren't using the USB option on it, you can use it for one of those bendable USB LED lights and have it light the top of your console.
Arjan P
Soundaholic
- Joined
- Oct 2, 2012
- Messages
- 1,711
- Karma
- 1,250
- From
- Netherlands
- Website
- www.soundbyte.nl
- Gear owned
- DM3200 IFFW
Okay, so here's my situation: I have two monitors with Cubase on it, have no meterbridge and decided to stay without because of the space issues it would cause with the monitors. Who are both on a NewStar monitor arm each, which is super flexible, especially if I need visual contact with musicians in the recording room. If you look at the photo, you'll see a small 7" monitor left of the turntable, which I can use from the 2Seemy. Also, my DM is not on top of a 'table', but I have the front of it level with my home made desk on the left and right. It's only supported below.

Peter Batah
Soundaholic
- Joined
- Feb 9, 2017
- Messages
- 1,199
- Karma
- 569
- Age
- 68
- From
- Montreal, Canada
- Website
- www.cafejoya.com
- Gear owned
- DM4800 / MU1000
Very interesting thread gentlemen. Thank you all for providing your own personal setup and anecdotes. The photos are also essential in visualizing your individual workflows. This one's a keeper. Thank you. Peter
- Joined
- Oct 2, 2012
- Messages
- 1,824
- Karma
- 417
- From
- Queens, New York
- Website
- cmaffia.wix.com
- Gear owned
- 2 x DM3200, DA-3000
Arjan P
Soundaholic
- Joined
- Oct 2, 2012
- Messages
- 1,711
- Karma
- 1,250
- From
- Netherlands
- Website
- www.soundbyte.nl
- Gear owned
- DM3200 IFFW
Thanks mate! Yep, it's the basement and it took 4 years of work (ventilation alone was 1 year) - next to my day job and the studio still in session at the previous location. Vocal booth is 1.8 m2 (19 ft2), control room 13.6 m2 (146 ft2) and recording room 15.1 m2 (162 ft2). And I'm quite happy with it!
- Joined
- Oct 2, 2012
- Messages
- 1,824
- Karma
- 417
- From
- Queens, New York
- Website
- cmaffia.wix.com
- Gear owned
- 2 x DM3200, DA-3000
Arjan P
Soundaholic
- Joined
- Oct 2, 2012
- Messages
- 1,711
- Karma
- 1,250
- From
- Netherlands
- Website
- www.soundbyte.nl
- Gear owned
- DM3200 IFFW
I did most of it myself, but for some big jobs I hired contractors. things like putting up the dividing walls, and later the box-in-box stud walls and ceiling with insulation, and airco installation. It was a fun job to study several aspects, like ventilation, and then design and build to that - and eventually succeed in doing so ofcourse..
- Joined
- Oct 2, 2012
- Messages
- 1,824
- Karma
- 417
- From
- Queens, New York
- Website
- cmaffia.wix.com
- Gear owned
- 2 x DM3200, DA-3000
Beautiful job! I wish I had the space to do it right but I have to work with what I have.
I'd be happier with what I have if I had a larger room for the drums. My ceilings are only 6.5 feet.
Did you ever see the film "Being John Malkovich"? That office is like my studio
I'd be happier with what I have if I had a larger room for the drums. My ceilings are only 6.5 feet.
Did you ever see the film "Being John Malkovich"? That office is like my studio
New threads
-
-
TASCAM X8: how to move a Manual project to a Pocket Studio project
- Started by prenez
- Replies: 5
-
-
122 MK II and MK III Motor control PCB differences?
- Started by BobHicks
- Replies: 0
-